In order to create items in an agenda, you must first ensure that you are on the right team and have chosen the correct meeting.
The items are processed individually, and when all items on the agenda have been processed, you can send the agenda for review or release it to the meeting participants.
How to create agenda items
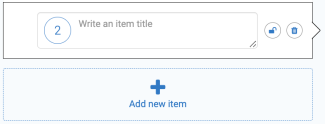
- Click in the title field

- Enter a title for the agenda item in the field
- Do you want to use alphanumeric point numbering (eg. 1.a), enter this by clicking on the item number
- Choose whether the item should be open or closed. Click on the blue padlock to close the item. The padlock will turn red and look like this

when the item is closed. If you do not click on the blue padlock, the item will be available for the whole organisation (if the meeting and the team are also open)
If the meeting is open, you have the opportunity to differentiate access to each item on the agenda. Open items will be visible to everyone in the organisation, where as closed items will only be visible to members of the team. You can narrow down the access to closed items further. Read more about how to remove team members from a closed item.
Create content for an item
Once you have created the item, you are ready to write or upload content to the item.
You can choose whether you want to:
- A: upload a document as the main document or
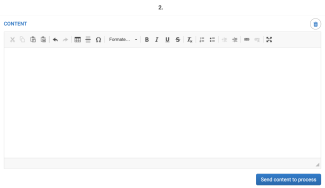
- B: typing the content in the text editor

A: Upload the main document
Attach the main document as a document is selected in the image below. If you already have formed the main document outside FirstAgenda, as a Word or PDF file, it is easiest to upload the document to the item's main document.
- Click on the field with the "blue cloud" (or drag the selected file to the field)
- Select the document you want to link via Windows Explorer. You can attach Office documents like Word, Excel and PowerPoint, PDF and various image files
- Once you have uploaded your document, processing of the document will begin
Important: Maximum file size per document is 100 MB.
- If you want to remove the file again, click "the trashcan icon" that appears at the far right when you upload a document
B: Write your main document in FirstAgenda
If you instead choose the function Write content, you have to enter the item's content in the text editor. Using the toolbar - the icons above the text area - makes it possible to style the text, insert and remove hyperlinks, etc. You do not have to save your written content along the way, as FirstAgenda automatically does it for you.

When you have no further to add to the item, you can either press "Submit Content for Processing" or create a new item, then the processing of the content processing will start while you continue working on the agenda. To create a new item, click on the blue "+", which you will find under the item you just created.

Appendices - how are they added?
If you have documents to be added as appendices to the item, you can click here to learn how to add the documents.
